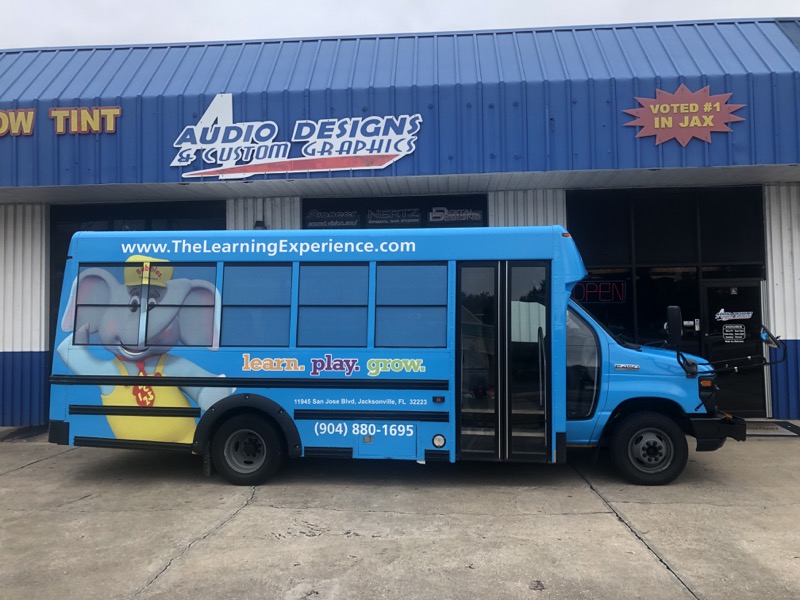
 Not long ago, the team from The Learning Experience here in Jacksonville contacted Audio Designs and Custom Graphics to design and install a graphics wrap on their shuttle bus. They wanted the bus to clearly represent their brand and felt that a custom wrap would help tell their story. We took several photographs of the bus and started work on a design that would achieve their goals.
Graphics Design Process
The graphics design team at Audio Designs and Custom Graphics in Jacksonville started by laying out the client’s artwork on photographs of the bus. We take special care to ensure that text and contact information will be easy to read and is not interrupted by features on the bus. In this case, the three black bump strips on the sides of the bus were used to divide information.
The Learning Experience uses a specific shade of blue on its website and at its locations. Since we planned on printing the artwork for the bus on our massive 64-inch inkjet printer, we created a series of blue color swatches for them so that they could choose the blue that matches perfectly.
Vehicle Wrap Graphics Printing

Our investment in a Mutoh VJ-1624X Industrial inkjet printer allows us to print massive graphics without the need to overlap multiple sheets. The reduction in the number of seams not only makes the end product look better but increases the durability and reliability of the installation.
For this bus, we used 3M IJ180 Controltac graphic film for the artwork. This high-quality film is designed specifically for use with wide-format printers like ours. The film and its adhesive will stretch around compound curves and adhere nicely over seams and rivets. As you can see, the ability to contour around tight features was a huge benefit around the side door of the bus where large rivets were used.
Once the film comes off the printer and passes under the heater, we give it time to set up before we transfer it to our laminator. The addition of a clear laminate over the artwork dramatically improves its durability and resistance to damage while adding protection against fading and discoloration from prolonged UV exposure.
We used perforated 3M Scotchcal vinyl for the artwork on the windows. This die-perforated pattern allows us to print detailed artwork for the windows while still allowing the driver and students to see out the window through the thousands of small holes in the film. The net result is similar to having a tint film on the window, but with the benefit of custom artwork.
Shuttle Bus Graphic Wrap Installation

After the team from The Learning Center dropped off their shuttle bus, we started the process of preparing the vehicle for the graphics installation. First, we washed the exterior of the bus thoroughly to remove any debris from the paint surface. We use a strong degreaser to ensure that any waxes or oils are removed and, where required, we use a clay bar to remove embedded debris from the horizontal paint surfaces. Our team worked the wrap around the contours and recesses of the vehicle to create an end result that would look amazing for the client. We degreased and cleaned the side windows in the same fashion to ensure the perforated vinyl looks great and stays in place. It took about two days to prepare the vehicle and install the wrap.
Jacksonville’s Vehicle Graphics Experts
With the wrap installed, it was time for the team at The Learning Center to pick up their vehicle from Audio Designs and Custom Graphics in Jacksonville. They were thrilled with the way the bus looks and loved that the artwork and text were easy to read, even from a distance. If you are interested in a custom wrap for your business or something unique to add style to your vehicle, contact our team of vehicle graphics specialists. We’d be happy to work with you to create something that tells your story and expresses your style. For more information or to schedule a personal consultation, give our store a call at 904-333-2322 or send us an e-mail using our contact page.
We look forward to working with you!
2 Responses